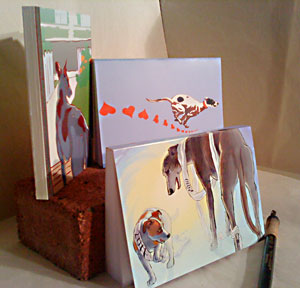
Whew! Well, it took some jiggering and figgering, but I worked out how to make my cards into truly neat little perfect-bound blank books!
I wanted to expand what I could do with my eco-friendly greeting cards, and expand my line at Stroke of Green. I brain-stormed for months, and finally hit on these little guys. But, how to make them books?
I studied up a bit on book-binding possibilities. I knew I wanted to do it myself. I explored various sewing options, and other binding possibilities, but they all cut into the images too much, or would mean buying job-specific tools and supplies, which I wanted to avoid, to keep the affordability in line, and the learning curve fairly easy.
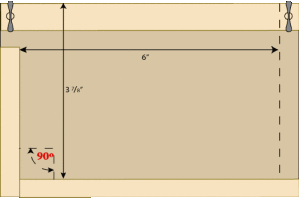 Eventually, I wound my way around to perfect binding, which basically means clamping and glueing the books together. That seems pretty straight-forward, right? I looked around online to see how to make a binding jig, to clamp the books during glueing, and alerted H that he’d be helping me make this thing, and gave him this sketch.
The idea is to plonk all the pages and one side of the cover in against that right angle in the lower left corner, against two pieces of wood, to align them all nice and square. Then you tighten the clamp down using the wing nuts (across the top), which leaves just about an eighth of an inch of page edges exposed so you can glue them.
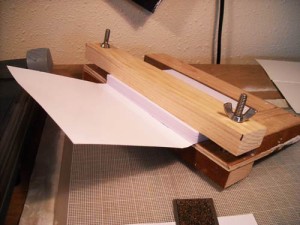
In the end, that looked like this:
As you can see, we used bits of scrap that happened to be within reach in the shop, some Gorilla Glue, bolts and wing-nuts.
Now, of course, it’s not ever as easy as you think, right?
First I had to figure out how to size the books, based on available paper, source and order the paper, cut it and trim the covers, score and fold the covers, figure out how many pages, try various glues to see which one worked ……….
I ended up buying sugar cane paper (a.k.a. bagasse), which is made from a waste product of the sugar industry (sweet!) I ordered just one ream to begin with, and, after messing around unsuccessfully with my rotary paper cutter, I took it all to Kinko’s to use their guillotine cutters. The helpful guy at the counter informed me he’d do the whole thing with his big machine for $4, so guess what I did? Yeah. That was the easiest part of the whole project!
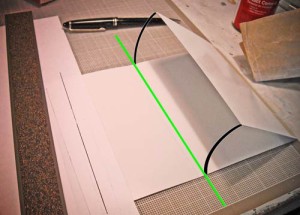
I figured I’d need to trim both the cards and the paper to make 4″x5.5″ booklets, to get the most out of each. I still had to trim the covers myself. The rotary cutter worked alright for that. Besides, each design is different, so I wanted to be able to trim so that the designs didn’t get important stuff cut off. Then I needed to score the covers, so they’d fold neatly around the pages. I tried this and that, and ended up making a simple jig on the edge of my cutting mat, like this. –>>
I taped one trimmed card to the edge (very securely) so I can tuck the card to be scored under it just so, place a piece of scrap paper over the cover, fold down the taped card, line up my ruler, flap back the taped card, and use a ball point pen to run along the ruler over the scrap paper and the cover. Sound like a lot of steps? Well, kind of! But it keeps things consistent, and the scrap paper keeps the pen from marking up the cover, or tearing it.
Then there was the glue question. I wanted to use Gorilla Glue, because it’s a little more earth-friendly. Sadly, it also has the tendency to foam up and dry hard as rock, making bumpy edged, inflexible spines. No good. Then I read that white glue (like Elmer’s) would work. Well, not really. Pages just popped out. Then I read that contact cement should work, drying quickly and flexibly. That worked! My little books came out like “real” books! Yeay!
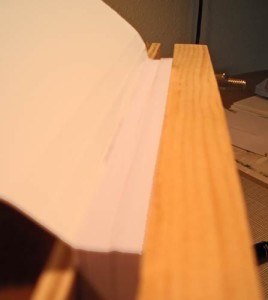
It was during the glue experiments that I had to solve the mystery of why some pages wanted to pop out more than others. I saw that, even machine-cut, all nicely stacked up, clamped page edges were not making a flat surface. Can you see that in this really bad picture? (Someday, I’ll figure out how to take decent pictures!)
Some websites talked about sanding the edges of the paper, to make it more receptive to the glue. I had done that, with varying success, but I decided to sand them down ’til they were all flush. That took a little elbow grease, but I need the exercise, so that’s alright. Once they’re all sanded flush, dusted off, and then glued, everything comes together smoothly, and stays that way.
So; trimmed, scored, folded, stacked, clamped, sanded, and ready for glue. I glob on the contact cement all along the page edges, and onto the spine of the cover. The first layer, I really massage into the paper edges with the brush, and it pretty much absorbs. Then I lay another layer on, nice and thick, which stays on the surface. I let this cure for 15 minutes, then go back and take it carefully out of the jig. Ever so carefully, I fold the spine down over the glued edges, knowing that if I get it wrong, that’s it, since you can’t un-stick it once it’s down. Then I burnish the edge with the smooth side of a box cutter (it’s handy, what can I say!), and set it aside for a few hours.
Voila! Easy as pie!
I’m really enchanted by these little books, I have to say. And I made them all by myself! They have a substantial feel, the covers are nice, colorful and smooth, all those blank pages are so inspiring … Yeah. I now have one by my bed to take down those midnight inspirations or weird dreams, one in the kitchen to jot down cooking experiments that actually worked, or grocery lists, one on my computer desk for the never-ending notes I’m always needing to put somewhere right this second, and one in my purse for those many times I need a bit of paper, either to leave a note or make one for myself (inspiration tends to hit me at odd moments). I’ve been stuck waiting, for planes or busses or whatever, and wished I’d had a journal to blab to. Now I’m all set!
You can get your blank books for a tidy $10 at Stroke of Green. Choose your own cover from my available cards (leave me a message in the order form if you want one I haven’t listed). They make nice little gifts, too. Hm! Mother’s Day is coming soon, isn’t it?
No responses yet